Side by Side Install
With OneStream Desktop 7.0.0, you can install the application alongside previous versions of the software.
There are several circumstances when you may need to use more than one version of the application. The most common scenario is that your company is planning to upgrade to a newer version, so a test environment is created with the new version to verify migration. To test this new version and maintain access to the current version, you need to install another instance of the application.
The application can only communicate with the back-end servers of the same version. This ensures that all the features of the application have been properly tested, and that unsupported scenarios cannot be introduced by upgrading only a portion of the system.
The new MSI based installer does not recognize or interact with the previous InstallShield based installer. All versions of OneStream Desktop prior to 7.0.0 must be handled independently. OneStreamDesktop 7.0.0 may be installed while previous versions remain on the machine.
Installation Scope
OneStream Desktop can be installed for the current user only (per user), or for all users on the machine (per machine). Installing per machine requires administrative privileges and makes the application available to all users on the machine. Installing per user can be done by any user, and will not affect any other user of the machine.
Named Instances
The application installer, setup.msi, can be installed up to eight times on a single machine. Each installation instance has a specific name embedded in the installer. These names are:
- 0
- I2
- I3
- I4
- I5
- I6
- I7
- I8
Each instance has a corresponding name in the installation folder and shortcut. For example, I2 has a shortcut name of OneStream Desktop (2). The default instance is named 0 and does not have a corresponding change to the installation folder or shortcut.
NOTE: More than one user can have the same named instance installed.
NOTE: With a per machine installation, you must use a named instance that is unique across all users on a machine. It is possible that all eight instances may already be claimed and the installation attempt fails.
Installation
Installing multiple instances of OneStream Desktop on a machine requires understanding both the impact of the different installation scopes, and a knowledge of what has already been installed on the machine, including what per user instances have been installed by other users. To simplify the process, there is a PowerShell script provided (setup.ps1) that can handle gathering all of the necessary information and execute the installer with the correct configuration.
To execute a per machine installation, you must open an elevated (admin) PowerShell. Executing the script in a non-elevated PowerShell will execute a per user installation.
If there are no existing installations when you execute the script, no message is displayed and the installer is immediately launched with the default named instance. If there are one or more installations already on the machine, the script provides a series of prompts to guide you through the installation process.
The following examples provide further information to help understand how to use the script in different scenarios.
Non-Elevated, Per Machine Only
In this example, the script is running in a non-elevated PowerShell (per user). There is one existing per machine installation.
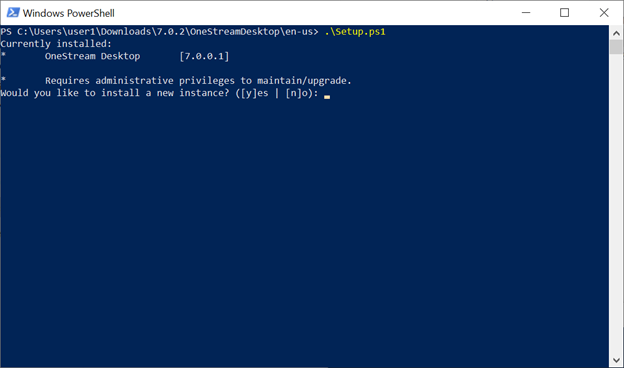
First, all existing instances are listed. The list of known installations is the combination of all per machine installs, plus all per user installs for this user. The asterisk (*) signifies that the installation is a per machine install, and that it cannot be modified because that would require running in an elevated PowerShell.
The only operation that you can perform is to install a new instance of OneStream Desktop, so that is the prompt.
Non-Elevated, Complex
In this example, the script is running in a non-elevated PowerShell. There are a combination of both per machine and per user installs already on the machine.
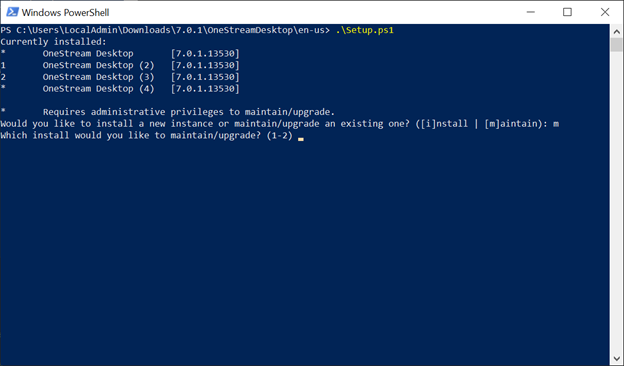
There are four existing installations of OneStream Desktop. The first and fourth installs are per machine, and therefore cannot be modified in a non-elevated PowerShell. The second (I2) and third (I3) instances are per user, and can be modified in the current PowerShell. Typing ‘m’ and pressing Enter to maintain an instance will prompt you to select which installation to modify. Only modifiable instances have a number at the beginning of the list to choose. Typing ‘1’ and pressing Enter will launch the installer for the selected instance.
If you want to install a new instance, type 'i' at the first prompt and press Enter to launch a new per user installation.
Elevated, Per Machine Only
This example is the same as the Non-Elevated, Per Machine Only example from an elevated PowerShell.
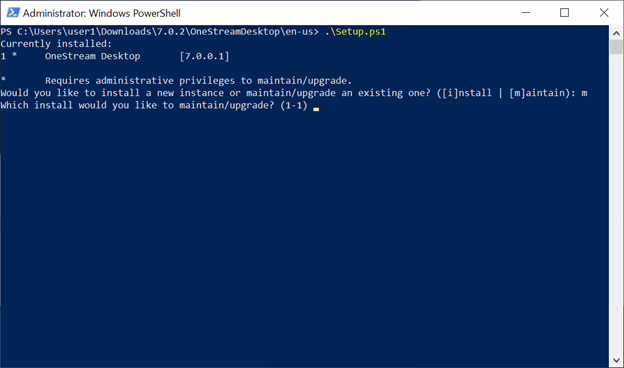
Because the PowerShell is elevated, the existing install can be maintained. Selecting ‘i’ from the first prompt will install a new per machine instance, while selecting ‘m’ will prompt you for which instance to maintain, which will then launch the installer for that instance.
Elevated, Complex
This is the same as the Non-Elevated, Complex example.

All instances are numbered, meaning in this elevated PowerShell, any of the installs can be modified. The per machine installs are still marked with an asterisk (*).
Advanced Installation
The OneStream Desktop installer is a standard MSI file, and common command-line attributes are available. You can perform advanced installations using the msiexec.exe tool that is deployed with Windows operating systems.
To perform a silent installation, use the /qn command-line parameter. This triggers an install that does not show a user interface, and installs using defaults.
To install a specific named instance you must set two properties. MSINEWINSTANCE=1 is always required, regardless of which named instance is installed. The second property is TRANSFORMS=":<instance name>", where <instance name> is I2-I8.
There are a number of command parameters that can be used, followed by the name of the MSI file. The /i command is to install, and the /x command is to remove.
The /l parameter, followed by a log file name, enables logging. There are various levels of verbosity, which you can find in the msiexec documentation. The most verbose option would be /l*v <file.log>.
The following example would launch the installer with the full user experience, and log everything to a file:
msiexec.exe /i setup.msi /l*v setup.log
This example performs a silent install of the 3rd named instance (or maintains it if already installed):
msiexec.exe /i setup.msi MSINEWINSTANCE=1 TRANSFORMS=":I3" /qn
NOTE: Don’t forget the colon in the TRANSFORMS property.
NOTE: If you are using PowerShell and press the Tab key to autocomplete the name of the MSI, it will insert ‘.\’ in front of your MSI file name. This will not work and those characters must be removed.
NOTE: Installation scope is still relevant when performing an advanced installation. To install per machine, the advanced command-line must be performed in an elevated context.