Mass Update
NOTE: Mass Update has restricted access.
The Planning solutions store the loaded data and related solution objects using a text string reference to the Workflow Profile name that loaded the data into the Solution Data Register. The Workflow Profile name is stored as a text string rather than using the Workflow Profile’s GUID identifier to provide optimum performance for the Calculate Plan function.
An issue may arise if the Workflow Profile that loaded data is renamed in OneStream. This will break the link between the Workflow Profile and the stored text string name in the Solution Data Register. The users in the renamed Workflow Profile will not see the data that was previously loaded into the Solution Data Register because the new Workflow Profile name does not match the previously stored text string.
The Mass Update feature has been added to the Planning solutions to resolve this issue when a Workflow Profile is renamed in the application. This feature allows the “orphaned” text string with the old Workflow Profile name to be selected and changed to a new Workflow Profile name. The solution presents the current list of application Workflow Profiles to select the new Workflow Profile name to update the solution text string name. This will establish the link to access the previously loaded Solution Data Register and related plan components with the new Workflow Profile name.
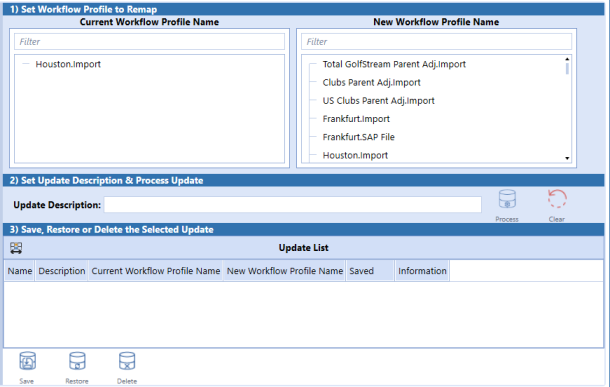
Step 1 in the Mass Update process requires the selection of the “orphaned” text string for the renamed Workflow Profile in area 1 of the Mass Update Dashboard. Then point it to the new Workflow Profile name from the application Workflow Profiles.
Step 2 requires entering an Update Description name for this change to be entered in area 2 of the Mass Update Dashboard. Click on the Process button to prepare the Mass Update changes. This will prepare the changes and store them in the Mass Update queue table. Notice that the change will now be listed in area 3 of the Mass Update Dashboard.
Step 3 is to select the change from the list in area 3 to be applied to the Solution Data Register and related components. Click on the Save button to commit these changes to the solution. If a change needs to be reversed for any reason, select the change from the list and click on the Restore button to revert the change back to the old text string name. Changes can be selected and deleted with the Delete button to remove them from section 3 but great care should be taken when doing this as this will remove the ability to Restore any changes that have been committed.
