Train Me Content Setup
Under OnePlace, select the Train Me Admin Dashboard from the XFW Train Me Dashboard Profile.
Create Video Categories
Click  from the Video Categories Tab in order to add new content categories.
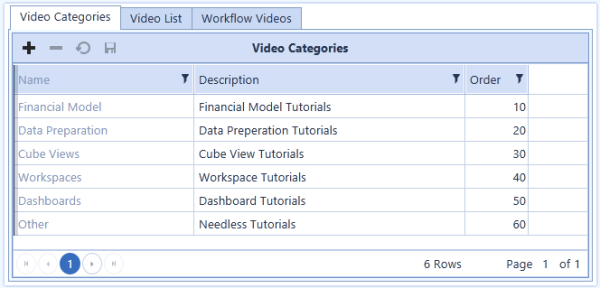
Fill out the properties about each category:
Name
Unique identifier used internally
Description
Information that displays in the left frame in Guided Reporting
Order
Display order for the Video Categories on the Train Me Solution screen
Copy Video Content to the Web Server
In order for the video content to be hosted to users, the video files should be copied to the Web Server which allows streaming of files without having to load them from a remote file share first.
File path
C:\Program Files\OneStream Software\OneStreamWebRoot\OneStreamWeb\Pages\
All video content presented in the Train Me Solution should be copied to this folder or subfolders within this folder. Video content can be organized into sub folders within this path as desired. Simply ensure that the Video File URL is pointing to the appropriate path during the video list setup.
Create Video List
Once the video content has been loaded onto the Web Server, the next step is to show the video list to the users.

Fill out the properties about each category:
Category
Select a category type from the drop down list
Video Name
Name of the content being shown to the user
NOTE: This does not need to match the actual file name of the video content
Description
Details of the video content being shown to the user
Created By
Information on who created the video content
Version
Version of the video
Video File URL
URL to launch the video file
The URL must begin with http://<FullyQualifiedWebServerName>:50001/OneStream Web/Pages in order for the video to launch correctly.
Ex: http://localhost.onestream.com:50001/OneStreamWeb/Pages/OverviewWorkspaces.mp4
http://localhost.onestream.com:50001/OneStreamWeb/Pages/TrainMe/Dashboards/Dashboards1.mp4
NOTE: The web server name must be fully qualified for the videos to launch correctly for all users.
Order
Display order for the Video Categories on the Train Me Solution screen
Add Workflow Videos
Once Workflow video content has been created and uploaded to the Web Server, it can be added to the Workflow Video setup screen.
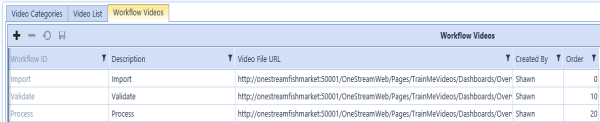
Workflow ID
The Workflow ID is a string used to link the video to a specific Workflow Dashboard. The string entered in this field must match the value in the Workflows defined on the Global Options screen
(Workflow 1 Subject – Workflow 6 Subject)
Any string can be entered here as long as it matches the values in the Parameters
Description
Details of the video content being shown to the user
Video File URL
URL to launch the video file
The URL must begin with http://<WebServerName>:50001/OneStreamWeb/Pages in order for the video to launch correctly.
Ex: http://localhost:50001/OneStreamWeb/Pages/TrainMe/Workflow/Workspaces.mp4
Created By
Information on who created the video content
Order
Display order for the Video Categories on the Train Me setup screen
Assign Workflow Videos to a Dashboard
After adding Workflow video content from the Admin screen, the next step is linking the videos to the individual Dashboards. Navigate to the Setting Screen  and update the text value for each of the Workflow Subject Parameters 1-6 with the value from the Workflow ID field created in the last step.

Assign Workflow Videos to Workflow Profiles
Once the Workflow videos are linked to a Dashboard, assign them to the desired Workflow Profiles.